Weather Phase
Weather changes to Fair
American Raid Phase
No Raid
Reinforcement Phase
No reinforcements for either side.
American Command Phase
Cadwalader absorbs the 350 troops from detachment 7. Detachment 7 is removed from the map for re-use later. Note: Cadwalader does not need to be activated to absorb the detachment. The American player activates Washington, for 4 activation points, and then activates Stephen, Dickinson, and Greene with his command span. Greene then activates Glover, Sargent, Lord Stirling, Fermoy, and St.Clair with his command span. The American player activates Cadwalader, for 2 activation points, and he then activates Hitchcock with his command span. The American player now has 10 activation points remaining.
American Action Phase
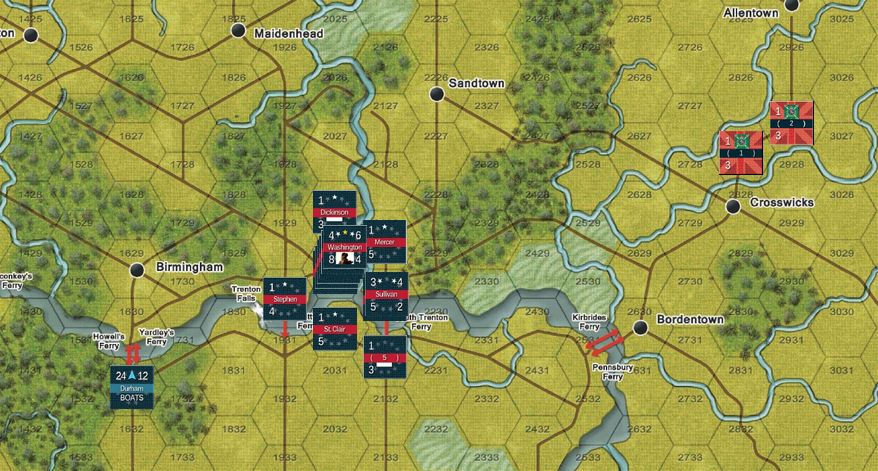
Cadwalader and Hitchcock move to 2831 and increase their fatigue level to 2. Stephen is far from the attack on Trenton that the American player is planning for this turn so the American player declares that Stephen will force march. Stephen rolls for movement points and receives 6 movement points. Force marching adds an additional 3 movement points to the rolled result (only 2 movement points if it is a British leader) so Stephen can move 9 movement points and moves to 1930 (move shown below in white). Stephen gains 1 fatigue for the move and 1 more for force marching so his fatigue level is now 4.
Turn 3: December 26th, 1776 7am (Day Turn)
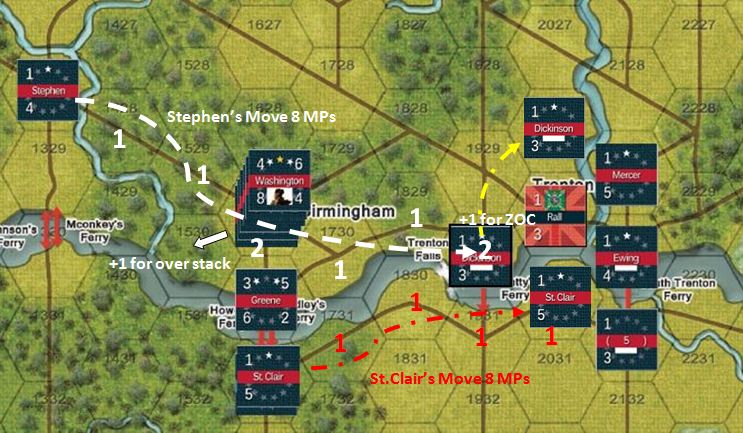
Dickinson now rolls for movement and receives 7 movement points. Starting in hex 1930 (movement in yellow above) he first enters hex 1929 which costs 3 movement points, 1 for moving along the road, 1 for leaving a ZOC in 1930 and 1 for entering a ZOC in 1929. Dickinson then continues moving to 2028 paying 4 more movement points. Dickinson fatigue level is now 2.
St. Clair rolls for movement and receives 9 movement points and tries to cross the ferry to hex 1630. On a die roll of 0, modified by the Durham boats and the time of the month to a result of 3, no troops can cross and the American player questions how St.Clair can manage to roll the only result which will fail to get him across the river. St. Clair has now spent 4 movement points in his attempted crossing and moves downriver to 2030 expending 4 more (move shown in red above). St.Clair now has a fatigue level of 1.
Glover, Sargent, Lord Stirling, and Fermoy now roll for movement points as a group and receive 6 movement points (Note: Washington moves along with the group, he has 13 movement points), moving from hex 1629 to 1729, 1828, and 1929 expending 3 movement points for moving along the road and 1 movement point for entering the ZOC of Rall in Trenton. The American player attacks Trenton with Washington and pays 1 movement point for the terrain which Rall occupies and 1 movement point for a Hasty attack. If the American player had rolled more movement points, he could have launched a better attack but with 6 movement points this is the best he can do.
Attack on Trenton
The American player has 2,890 troops in his stack attacking Rall with his 1,250 troops. The first step in resolving combat is to determine any Surprise modifiers to be applied to the attack. The American player rolls a 6 on the Surprise table and applies a -1 modifier since this is a hasty attack and a +7 modifier since he is attacking Trenton in the first am turn of the game (think Pearl Harbor surprise) for a result of 12. The American player will receive a +4 modifier to his combat die roll and a -10% to his casualties as a result of surprise.
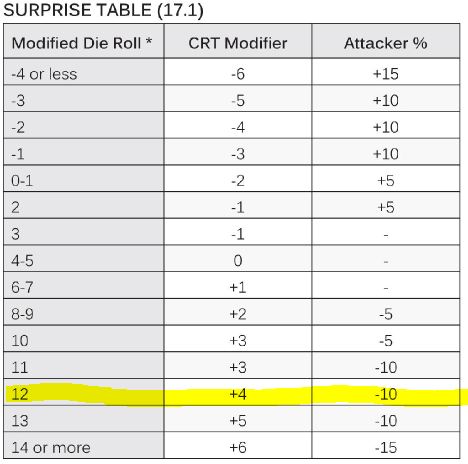
The American player now rolls on the Combat Result Table using the 7-8 column because Washington has a leader rating of 8. The American player rolls a 2 which is then modified -1 for the hasty attack, +1 for Americans on the attack, +4 for the surprise result, +2 since Washington outnumbers Rall by 2 to 1 and +4 since Rall is outflanked by American leaders in all 6 hexes around him. The final result is a 12 which yields a result of 20/60! The attacker result is on the left so Washington would take casualties equal to 20% of the defenders strength. However the surprise result decreased Washington’s casualties by 10% so the American’s lose 10% of Ralls strength or 130 troops. The American player can distribute his losses as he sees fit (exception for Washington’s bodyguard) and chooses to take them all out of Lord Stirling, reducing him from 570 troops to 440.
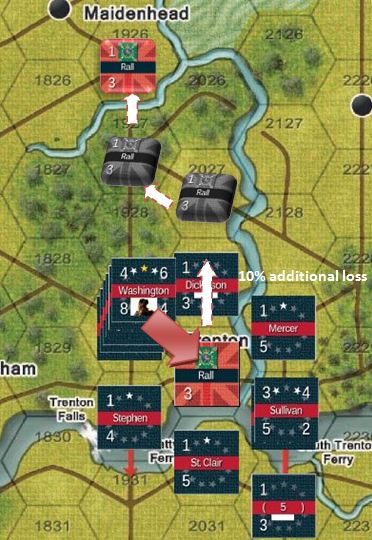
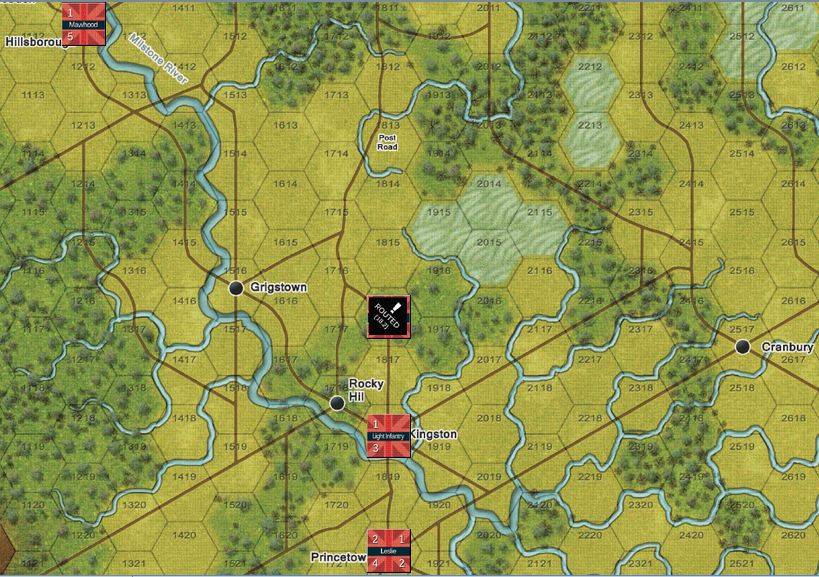
Rall takes 60% casualties from his strength of 1,250 or 750 leaving him with 500 troops. The ! result means that Rall is routed and must retreat 4 hexes. Rall must now retreat through the American leaders as he is completely surrounded and he chooses to retreat through Dickinson in 2028 and then to 2027, 1927, and 1926. Retreating through Dickinson causes another 10% loss to Rall from his original strength for 130 more casualties reducing him to 370 troops. When surrounded the first hex of the retreat is up to the retreating force but after that the retreat priorities dictate the path, no retreat through enemy leaders with troops, avoid enemy ZOC, retreat toward your map edge, ( top edge for the British) stay on the roads if possible, etc. Rall has his fatigue increased by 3, one for defending in a combat and taking at least 5% loss and 2 for being routed. Rall is now at 4 fatigue.
Washington must now advance after combat into Trenton and may continue moving with any troops which still have movement points. Since all of his other leaders with troops rolled 6 movement points and they have used 6 movement points they cannot move so the only leaders who can keep moving are Washington and Greene who always have a movement allowance of 13. The American player is content with where Washington and Greene are and halts their move in Trenton. Washington, Glover, Sargent, Lord Stirling and Fermoy gain 2 fatigue, 1 for moving and 1 for attacking. Washington, Glover and Sargent are at fatigue 2. Fermoy and Lord Stirling are at fatigue 4. Greene has no troops assigned to him and gains no fatigue. The American Player gets 6 victory points for a major victory. Sullivan moves to 2130. Since he has no troops assigned and activated no other leaders he may be activated for free and move 13 movement points without gaining fatigue.
The American player may now activate one leader with an activation cost of 2 or less by die roll, (day turns only). The American player decides to try to activate detachment 4 which has a leadership rating of 3. This means the American player must roll a 3 or less to activate the detachment. On a roll of 2 the detachment is active. The detachment rolls for movement and gets 7 movement points and moves to 2346 and the detachment now has a fatigue level of 1.
American Recovery Phase
There is no recovery from fatigue during day turns and this phase is skipped. A leader like Stephan who is at 4 fatigue will need 4 night turns or 2 complete nights to recover to 0 fatigue. In addition he cannot move or attack during the day turns or he will just increase his fatigue. This cycle of having periods of action followed by periods of rest is central to the game and is just as important to manage well as maneuver or combat if you are going to beat the enemy.
British Command Phase
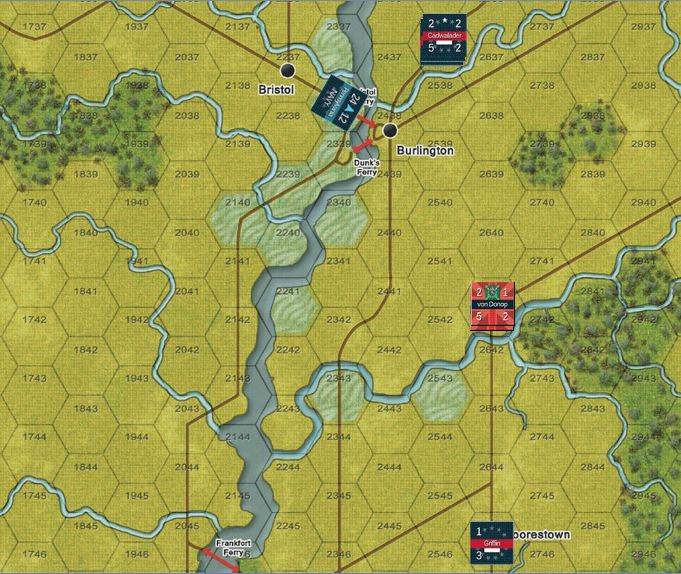
The British player can only activate certain leaders on this turn, (the rest are still thinking nothing will happen until spring). Rall can move without activation because he is routed and within 10 movement points of enemy troops. Available to activate are vonDonop, Stirling, Hessian detachment 1 and Hessian detachment 2. The British player has only 8 activation points and decides to be conservative spending 2 activation points to activate the 2 Hessian detachments.
British Action Phase
When rolling for movement points with British leaders, several facts become obvious. First the average British leader is rolling on a worse column for movement than the Americans as they generally have a lower leadership rating, (there are exceptions, look at the American leader Fermoy). Secondly all British units except Vanguard have a -2 modifier to the movement die roll. Thirdly all British force marches get only 2 extra movement points to the Americans 3 extra movement points. All of this means the British player moves slower and must really plan his moves far in advance or the American player will run circles around the British leaders.
Hessian detachment 2 rolls 5 movement points and moves to 2927. Hessian detachment 1 rolls 4 movement points and moves to 2827. Both gain 1 fatigue. Rall gets 10 movement points to spend while moving while routed and moves to 1816. Routed units try to move away from enemy troops and/or move to their supply base and Rall is doing both. He gains 1 fatigue for moving and is now at 5 fatigue. The British player may now attempt to activate 1 leader by die roll and rolls for vonDonop. A roll of 3, lower than vonDonop’s leadership rating of 5, means vonDonop is active and he uses his command span to activate Stirling. VonDonop rolls for movement points as a group with Stirling and gets 5 movement points and they both move to 2641. Rall and Stirling both gain 1 fatigue.
British Recovery Phase
None since it is a day turn
Situation at the end of Turn 3.
North Front
Central Front
South Front